Hello Everyone!
You may have noticed that the picture is not up at the top. That is because I have been going through some of the blocks and have determined that a few may not look just right because of their original size and may not translate well into this quilt. I am auditioning other blocks to see if they might work out a little better and that is part of the reason that the blocks are a little late this month. Blocks are subject to change and I reserve this right.
Thank you for your patience.
I haven’t been on much lately but I’m BACK! I seemed to have lost my sewing mojo last month and am getting caught up.
Can you believe that we are already into May and that we are almost halfway through our quilt! Since we have 16 blocks made it is time to start thinking about possibly sashing our blocks. Me, I’m thinking of black thin sashing. Since we are doing 4 at a time, maybe grouping the blocks together that way may be best. I will leave the color and size up to you.
Tomorrow, May 6, I will be posting the Bonus Border Blocks plus a couple of blocks just a little bit early.
Chat more later!
Please make sure that you go to July, Bitty Boats. It is very easy to make. I am still finishing mine and will be posting them tonight.
Just to let you know I have been playing around with the layout for May’s blocks and am still deciding between 2 different blocks as the first one. Sew easy to get distracted when looking at patterns! 😍😊
BLOCK #1: TWO STRIPS AND THREE TRIANGLES:
This is a very easy block to put together and a little addictive! I think it would make a great secondary block or a bridge.
For the block, you will need two strips that measure 6.5 x 2 inches. Sew those together. You will also need three 2.5 inch half square triangles (HST). Sew those together and then attach to the bottom of the block and you are finished! The block should finish at 6.5 inches all around.
BLOCK #2: BOX-IN-A-BOX VARIATION:
This block looks easy and it is but it is also an exercise in set-in seams. Remember, when you do your set-in seams (not Y-seams) you want to go just to the edge of the seam, don’t cross over it. Very easy, but you might want to pin it to make sure you get it just right.
These are the colors that I chose.

CUTTING INSTRUCTIONS:
- From the background, you will need to cut the following:
Two 1 1/2 inch x 7 1/4 inch strips.
Two 1 1/2 inch x 5 1/4 inch strips.
2. From the alternate color, you will need:
Two 1 1/2 inch x 7 1/4 inch strips.
Two 1 1/2 inch x 5 1/4 inch strips.
3. And for the focus fabric, one 2.5 inch square.


You will need to cut the four outer pieces at a 45 degree angle on each end. This will help with the set-in seams.
SEWING INSTRUCTIONS:
Starting with the center 2.5 inch square, attach the two dark alternate colors to each end. (I forgot to take a picture with just the ends.)
Next, add the first background at the top. When you finish attaching it, then carefully sew from the edge but make sure that you don’t cross over the stitch line. Otherwise, you will have a mess. Ask me how I know. 😀 Make sure to press in between so that it stay flat.
Then repeat for the remaining three pieces using the same technique.
And here is the finished block:
I will be posting the last two blocks tomorrow. My computer decided it needed to update and I wasn’t able to access it for most of this evening.
HAPPY MOTHER’S DAY! I hope everyone had a wonderful day!
BLOCK #3: FLYING SQUARES:
Here is a tutorial for this whimsical take on a 9-patch. Please make sure to scroll down a ways for the pattern. The pattern states that it finishes at 5.5 inches, so in order to fit, you will need to adjust the size of the squares to 1 3/4 inches instead of 1 1/2 inches. Please keep that in mind while putting it together, otherwise it will be too small. Please note that this also involves set in seams.
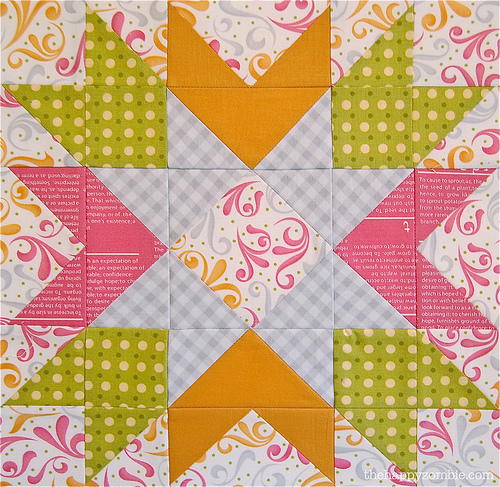
BLOCK #4: ZENITH:
This is an intermediate block but easy to assemble. It is made up of half square triangles and flying geese; even though you can use all HST even for those units. You can find the pattern here at Patchwork Square. Please note that is a 6.5 inch block when finished so make sure you print that section out. I will be posting mine sometime tomorrow.
I finished mine this morning but am not happy with the way it turned out. I am not fond of making flying geese units the way they showed it in the pattern, so I will remake it using a different method.
Thank you for playing along!
May 13, 2019: I seem to have injured my right shoulder and it’s very painful to move. I will try and post later this week. Thank you for understanding.
Share this: https://groups.io/g/TheScrappyQuilters/
Related