JANUARY 12, 2019 BLOCK #4: OHIO STAR VARIATION
NOTE: I had planned to do Birdhouse for this block and I made two of them, neither of which I liked after they were finished. That is what took me so long to post this morning. EQ8 left off the last few pieces of the instructions on both variations and their sizes were off and I kept having to trim down on the sizes of the units. Thank you for playing along.
BLOCK #4: OHIO STAR VARIATION: This time I am sending a link for the pattern. Remember to click on the 6 x 6 inch pattern. I will be posting mine a little later today. Here is the pattern link: https://www.thesprucecrafts.com/ohio-star-quilt-block-pattern-variant-2821199 I will post a picture later. You can also find the pattern at http://quilterscache.com/O/OhioStarBlock.html. It is the same pattern except that you will need to add half square triangles at all four corners. The reason I mention this is that I have found that it is impossible to download or print the pattern at Spruce Crafts and this is a good alternative in case you need a printed pattern.
This is my block. It’s a little off as I was having trouble focusing my eyes yesterday. 😀

FABRIC REQUIREMENTS:
Color #1: White background (or light)
Color #2: Dark color
Color #3: Contrasting color
Color #4: Medium to light color or a small print for the center
CUTTING INSTRUCTIONS:
This is for a 6 inch block
From the light background, you will need:
- Two 2 7/8 inch squares (or you can go up to 3 inches and then trim later)
- Two 3 1/4 inch squares
From color #2, dark color, you will need: Two 3 1/4 inch squares
From color #3, you will need: Two 2 7/8 inch squares (or you can go up to 3 inches and then trim later)
From color #4, you will need one 2 1/2 inch square.
SEWING INSTRUCTIONS:
1. Take the light and medium squares, cut on the diagonal once. Now sew the dark and light HST together to make a half square unit. This will be used for the corner units.
2. There are two options for this. The first one involves watching the Missouri Star Quilt video or doing it the old fashioned way. You will need 4 hourglass units for this block. If you use the pattern from Quilter’s Cache, it will show you how to make the hourglass units.
NOTE: Please remember that if you go with 3 inches as opposed to 2 7/8 squares, you will need to trim it down to 2.5 inches. For making your hourglass units, I would watch this video from youtube.com: This is from Jenny Doan of Missouri Star Quilts and I love her shortcuts and it is so much easier to do them this way.
https://www.youtube.com/watch?v=uIyHqggI_eU.
3. Once you have all of your units made, sew together in rows, either horizontal or vertical to finish the block.

This was before I trimmed them down to 2.5 inch square units.
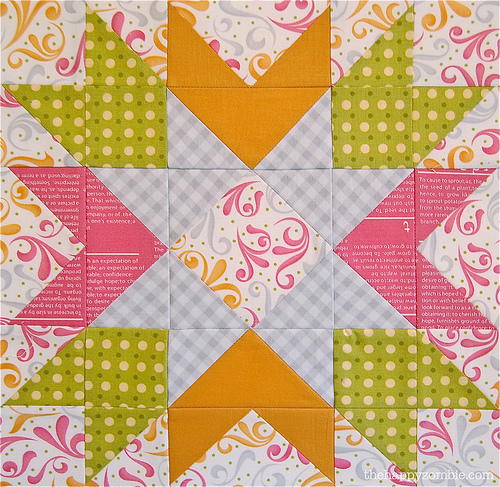
Finished block. I may remake this block
JANUARY 11, 2019: BLOCK #3: LONDON ROADS

I love these colors together, soothing and they look good with the other blocks.
FABRIC CHOICES:
Color #1: Medium to dark color
Color #2: Contrasting color, I chose a print
Color #3: Light color
CUTTING INSTRUCTIONS:

1. From the first color, (in my case the green) you will need to cut two 3 inch squares. From those squares, cut once in half diagonally to give you 4 half square triangles. EQ8 says to cut 2 7/8 inches, but I prefer to cut larger and then trim down.
2. You will also need to cut a 2 1/2 inch square for the center.
3. From the light color for the background (I used yellow) cut 8 (eight) 2 1/2 x 1 1/8 inches.
4. Also from the light color, cut one 3 1/4 inch square and then cut it diagonally twice to give you 4 half square triangles.
5. From the dark color (or print) cut one 3 1/4 inch square and then cut it diagonally twice to give you 4 half square triangles.
SEWING INSTRUCTIONS:
- Please make sure that you line up your quarter square triangles the right way or else your arrows will be going the wrong directions. That’s why I have them laid out that way for sewing so I don’t confuse myself, but it still happens.
- Sew your light and contrasting color quarter square triangles together and then sew to the half square triangle. You will have 4 units.
- Now sew your eight 2 1/2 x 1 1/8 inches together.

Now sew together. This is how the block should look. Be careful with the arrows, they can be confusing especially when laying them out.

The finished block should measure 6.5 inches.

BLOCKS #1, 2, AND 3:

NOTE: BLOCK #4 HAS BEEN CHANGED AND A DIFFERENT ONE HAS BEEN CHOSEN. IT WILL BE ANNOUNCED TOMORROW, SATURDAY 12. THE REASON IS THAT EQ8 ONLY SHOWED THE FIRST FEW INSTRUCTIONS AND LEFT OFF THE REMAINING PARTS. THAT MADE THIS BLOCK HARD TO MAKE AND I AM NOT HAPPY WITH HOW IT TURNED OUT. I WILL BE CHANGING THE PICTURE IN THE QUILT TOMORROW TO SHOW THE DIFFERENT BLOCK. MY APOLOGIES. AS I HAVE STATED BEFORE THE QUILT TOP IS SUBJECT TO CHANGE.
PLEASE NOTE THERE IS A CORRECTION TO BLOCK #2, SUSANNAH. THANK YOU. SCROLL DOWN.
QUESTIONS AND POSSIBLE ANSWERS:
Yardage for certain colors. Here are the dimensions of the quilt (so far) starting with the top and then the inner and outer borders.
Quilt Top 39 x 52 based on 6.5 inch blocks from EQ8
Inner Borders 2.5 inches all around, most likely a solid border
Outer Borders 3.5 inch with different blocks going all around.
Please let me know if I am correct on the yardage estimate as EQ8 only tells me by the individual blocks and not the full quilt. If it does do that, I can’t seem to be able to figure it out. 😀
I believe that it will work better with more than 4 colors, not just for the way the quilt is designed but for contrast in the blocks.
For 5 or more colors for the blocks, if you want to buy yardage, I am estimating about 2 to 2.5 yards, plus extra for the background colors. As for the borders, those will measure 3.5 inches and you may be able to use some of the yardage from the other blocks. There will be some blocks that will require certain colors but I am thinking that will be minimal and you can probably use scraps.
I am doing controlled scrappy so please remember that it’s a little harder for me to estimate yardage. Please let me know if you think this is correct or if I’m full of hooey. 😀 Also, please note and remember that the quilt top is subject to change and that this is just a guide of what we are working on.
JANUARY 5, 2019 NOTE: All blocks can be found on EQ8 with directions and fabric requirements. Just go to Block Library, put in the name of the block, make sure it is 6.5 inches and you can print from there. For those who don’t have EQ8 here are the instructions. I strongly suggest using a ruler that has markings on it for 13/16, 1/8 and so on as these will be used a lot.
BLOCK #1: Four Star Variation #3: Note, I had taken pictures of the first block I made but they were deleted accidentally. I went ahead and made a second block which I like a lot better. That’s why it looks different from the saved pictures.
Fabric Needed:
Color #1: Medium green, two 5 inch squares
Color #2: Light color, two 5 inch squares
I had some fun parrot fabric and a gold squiggly fabric that looked nice together. When I went to make the second block, I found that I was out of the gold squiggly and went with a light tan leaf pattern to go with the parrots.
Cutting Instructions:
You will need two 3.5 inch squares of either print or background. Totally up to you how you want it to look.
You will also need four 2 inch squares of both print and background. The layout is below and is very easy.


Since I wasn’t happy with the results, here is how mine turned out, just reversed. Your block should measure 6.5 inches. You can see my ruler next to it by zooming in on the picture.

BLOCK #2: SUSANNAH:
This is a simple variation of a box in a box block. When sewing it together, make sure that the dark and light blocks are opposite each other all around the block. This is a fairly easy block and fun to put together.
Fabric Needed:
Color #1: White or cream
Color #2: Dark pink
Color #3: Light pink
Color #4: Yellow
Color #5: Small coordinating print fabric
I chose to go with a solid green for the center as I couldn’t find a nice print to coordinate.

CUTTING INSTRUCTIONS:

From the dark, medium and background fabric, cut 2 1/8 inch. You will need four of each.
From the lightest color, cut two 2.5 x 2.3/8 inch rectangles. You will then cut those in half square triangles.
From the print for the center, you will need one 2 ¾ inch square. You will need to use a regular ruler to make sure it is the right size, or one that has markings that are clear. You might want to use a piece of painter’s tape to mark it on the ruler for reference.

SEWING INSTRUCTIONS:
I started with the center block. Using the lightest color (in my case the light pink) cut your 2.5 inch squares in half. Place your triangles all around the 2 13/16 inch square. This will give it a snowball effect.


Trim the block down to 3.5 inches.
Now for the tricky part. You need to make sure that the dark and medium squares are alternating all around the block with the background at each corner. Here is my outside of the block. Remember, it is easy to get confused. Just ask me how I know. 😀

Sew the top and bottom rows together and then the sides. Sew the sides to the center and then add the top and bottom.


The finished block:

BLOCK 1 AND 2:
Have fun!
CLUB STARTS: JANUARY 10, 2019
CLUB ENDS: DECEMBER 31, 2019
DEADLINE TO SIGN UP: NONE OPEN TO ALL
THIS IS NOT A SWAP, BUT A CLUB! This is designed for those of us who love challenges and miniatures, especially mini blocks!
Starting January 10, 2019, I will post 4 different mini blocks to work on. These will be pieced blocks, starting with easy and progressing from easy to challenging. You can access the block patterns with links that I will provide and you can find these in the files. I will be posting the first set of blocks with pictures on the 10th of each month. There will be no applique blocks, but there might be a little paper-piecing.
The size of the blocks will be 6.5 or 3.5 inches in size but no larger. Some blocks may appear to be incomplete, but keep them aside as they will fit into other blocks later on for the overall final design. This quilt top will be like putting together a jigsaw puzzle.
COLORS: I will be working with small prints, mostly scrappy colors but controlled. I prefer blues, reds, yellows, etc. You can use whatever you prefer, this is your quilt.
FABRIC REQUIREMENTS: Will be posted on January 1, 2019. Since I will be using scraps, it will be an estimate.
BLOCKS: All four blocks will be posted on the 10th of the month with directions and pictures. Please, I am only human, if you find a mistake or have a question, please let me know and we can fix it together.
The Mini Block Club is a yearlong commitment. I expect to see pictures at the end of each month in order to stay. The blocks will be available here and are free to use. I never charge for patterns as most of them are under a free domain. If you find that one of the blocks is one that you are not comfortable with, you can leave it out, but it might affect the quilt top later on, just saying so in advance.
Please do not just drop out without saying goodbye first. I am hoping that this club will bring friends closer and that we can have some fun!
JANUARY 1, 2019

Starting at the top and counting in 4, those are the blocks for January and then so on. Please note that the blocks are subject to change if and as needed. All patterns can be found in the files section starting January 10. If you have EQ8, you can find the directions and patterns there. If I find a link for an easier technique on how to make the block I will post it to the group.
I will be posting fabric choices and requirements on January 1. I will keep adding to this original post with the newest posts at the top of the page. You will need to scroll down after the first blocks are posted to find previous directions. Please remember to post pictures when you finish your blocks.
HAPPY NEW YEAR!
NOTE: In the picture these are 6.5 inches, but that doesn’t mean that all of them will be that size. Remember, there will be a few 3.5 inch blocks scattered in there and that is just a guide to show where we are in the quilt. The picture may not be the way the quilt top turns out. We shall see. Some may go in the sashing or in the borders. As we go along, I will give you clues as to where they will go.
There will be two outer borders. The inner border is 2 inches and the outer border is 3 inches. These are shown as the Inner Border having blocks at the corners and the Outer Border is shown as blocks going all around. PLEASE REMEMBER that this is subject to change and is just to show the size and design (for now) of the entire quilt top. PLEASE NOTE: I have been having issues with EQ8 and my printer/scanner, so we are going to just go with the first four (4) blocks as I have not been able to scan the fabric requirements. Also, if I posted all the fabric requirements it would be too overwhelming and confusing to follow as they are not in order of the blocks.
My color palette includes a lot of colors, but I prefer mainly solid or prints. This is just an estimate of what you will need, about 1/8th of a yard for the blocks. Unless otherwise specified, the blocks will require 1/8th of a yard and I will let you know if there are larger or smaller pieces that you can use instead. There are 48 blocks and since these are small this is also a good way to use up a lot of scraps. You can choose to go with yardage, scraps, FQ or a combination. I will probably be using scraps mostly as I have a lot. But you can choose to go with a certain colorway if you like. Please post your pictures in the comment section. I would love to see how you’re doing and I love eye candy!
There will also be 3.5 inch blocks scattered throughout, so when you go to make your blocks, there will be a BOLD ** next to it. For the first 4 blocks, they are all 6.5 inches but I am not telling you which block it is until the 10th, so make sure to stay tuned in!
FABRIC REQUIREMENTS:
Block #1:
Color #1: Medium green, two 5 inch squares
Color #2: Light color, two 5 inch squares
Block #2:
Color #1: White or cream
Color #2: Dark pink
Color #3: Light pink
Color #4: Yellow
Color #5: Small coordinating print fabric
Block #3:
Color #1: Dark to medium blue
Color #2: Burgundy or red, dark or medium
Color #3: Light color
Block #4:
Color #1: White
Color #2: Dark brown, 10 inch square
Color #3: Black, 5 inch charm
Color #4: Medium blue, solid
Color #5: Light blue or contrasting color, 5 inch charm
Have fun shopping your stash or at your store! This should keep you busy for a while. Remember to post pictures to stay in the group!

Share this: https://groups.io/g/TheScrappyQuilters/