Scraps, scraps and more scraps! What are we going to do with them? So many small pieces but no idea what to do with them but we don’t want to throw them out cuz they may actually be used? If you have this problem, and I know we all do, I have the solution! Grab your bins that are overflowing with those abundant squares that you have saved. You will need the following colors; various shades of red or burgundy and green in solid or small prints. You will also need cream, this can be either solid or small prints to add interest to the quilt. If you like you can use yardage, but I will be using coordinated scraps of leftovers in the same color scheme.
CORRECTION: We will also need some blue for the blocks. These are my choices. As you can see this is very scrappy. This is very easy and fast to make and there are no triangles involved at all. You will need an assortment of different sizes squares/rectangles. The next step will be posted on Thursday, June 5 in the morning. Have fun going through your bins and allow your inner child to play with colors. These are the colors that I will be using. This is a good way to use up scraps and you will need a good assortment of colors. I am not giving yardage for this as this will be from my scrap bins.
I will be posting pictures of my fabric choices on Sunday and the next step on Thursday, June 5. Please feel free to post pictures of your fabric choices. Chat later!
Part One
Good Thursday morning! And welcome back. As promised, here are the cutting requirements. While this is an easy quilt there are several pieces involved to make one block and as I promised earlier, no triangles at all!
There are 7 fabrics needed but you can mix and match and even use the same color twice in one block if you wish. I think it is better with a wide variety of different shades. Of note, if you have a lot of 3.5 inch strips left over from other projects, this will make the cutting go a lot faster.
1. For the center block, you will need to cut a darker color. I will be using red and blue for my center. Cut a 6.5 inch square. You will need 20 in total.
2. Now cut 3.5 inch squares of a dark green and repeat for a total of 20 squares.
3. Cut 3.5 inch squares of dark red and dark blue for a total of 10 squares, each color.
4. For color number 4, this will be the medium colors. Cut a variety of your tans, creams, etc into 3.5 by 6.5 inches for a total of 20 rectangles.
5. Color number 5 will be the darker creams and medium blues, greens and reds. Cut 3.5 x 9.5 inch rectangles for a total of 20 rectangles.
6. Cut a variety of the lighter to medium colors into 3.5 x 6.5 inch rectangles. You will need 20 of these, also.
7. For the final color, use a variety of light colors to make 3.5 x 9.5 rectangles for a total of 20.
I will be back Saturday morning to assemble the blocks. Thanks for playing along!
Welcome Back!
These are the colors that I chose and then cut into strips. All strips are 3.5 inches in width, and the length was 6.5 and 9.5 inches. I then had 6.5 x 6.5 inch squares, and 3.5 inch squares to use as part of the bottom row of the block. This block is very easy and can be used in a variety of ways.
Just remember that you will need 20 blocks, 10 dark and 10 light and it’s best to have a good selection of dark and light strips. If you have some left over they can be used in another project later on. I will be back later this morning and show how to assemble the block. I found that when putting the block together, it was easier to do one block at a time rather than chain piecing. I like to audition the block before sewing it together and I have limited space to do more than one or two blocks at a time.
PART 3: ASSEMBLING THE BLOCK
Note: All strips are 3.5 inches in width, so I will be referring to just length.
First, take a 3.5 dark red or blue square and attach to a light or dark 9.5 inch strip.

Now, take another dark red or blue 3.5 inch square and a light or dark 6.5 inch strip and sew together. Remember, if you have a light on top, you need a dark below and vice versa. The same for the sides. I only used dark 3.5 inch squares to keep it simple.
Now choose a 6.5 inch square and a 6.5 x 3.5 inch strip and sew together.
Note, before you add the final 9.5 inch strip, sew the 6.5 unit to the one above. Now, add your final strip:
And then finish the block and you’re done!

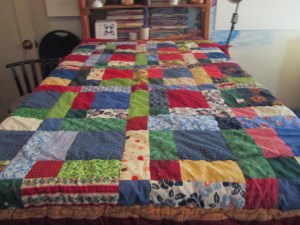
Told you it was easy! And very addictive! In less than a day, you can have your blocks done and ready to be made into a top. You will need 20 of these to make and they are 12.5 inches when finished.
Thanks for playing!


Leave a comment